One of the wish list items in my very long and never ending wish list is a Givenchy Pandora in Pepe Leather. All I knew is that I wanted a darker colour and if a black one came along at the right price, I would have taken the black, even though I have a severe aversion to buying black bags.
One night as I was stalking eBay, I found a really used, suntanned and faded Givenchy Pandora in what used to be an Aqua blue (not sure of the proper designer colour name). She looks like she has been loved to bits and I'm guessing the previous owner didn't like the way it had started to fade to yellows and greens in some part of the bag. I closely looked at every single picture and studded every miniscule inch of the bag. There was the usual wear on the corners, but nothing too horrible. The insides were immaculately clean. The only issue was there was a tiny tear on the leather on the crossbody strap where it attached to the large lobster claw. At this point, I couldn't really tell how severe it is, if it was torn on both sides of the leather or not.
My mind started ticking and thinking about what I could do to try and fix it and the only thing I could think of was Edge Kote. Edge Kote is basically the edge seal of any leather goods. I know them to be flexible and if I did a thick enough layer, I feel like I could prolong the tear from getting bigger.
One of the biggest push to get this bag was the price. At only $380 AUD, for the condition that it is, bar the small tear and discolouration, it's amazing, especially after envisioning what it would look like at the end.
I finally received the bag and it was beyond my expectations, the tear was only on one side of the leather, the inner part was still very intact so there would be no issue in just fixing the top part with the Edge Kote. The leather still smelt amazing, though sad looking from all the faded parts.
I'll stop talking/typing now and show you pictures of what I did. I couldn't really closely document each step as it was late at night and my mind was just racing to get it all done.
Note that I do not recommend to just do this on any bag. If you want to do something similar, do patch tests and do it at your own discretion. I took a risk and it seems to have paid off. The Pepe Leather on this Pandora is very forgiving, in a sense that it's very uneven in texture so it didn't matter how even each coat of dye was.
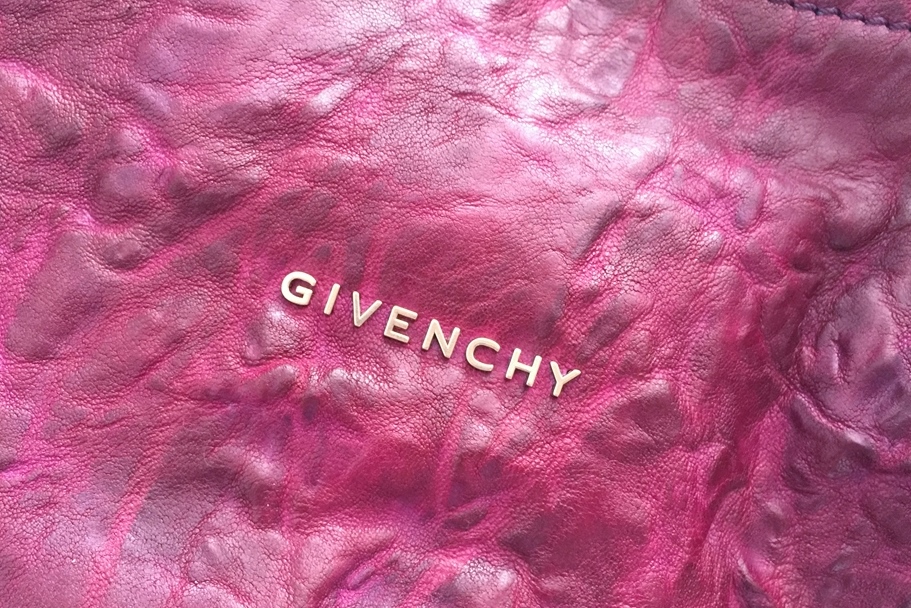
Above are photos of the original colour of the bag. These were taken at night in artificial lighting, but you can how faded it is at the front where the logo is. The back of the bag has a lot of discolouration on the side corners where it's turned green and yellowish. A lot of blue based bags like purples, magentas and all shades of blue bags that I've seen tend to fade with a green and yellow tinge.
These are the products I've used.
The leather Edge Paint is what I used to fix the small tear. The colour Green was on sale and I knew I would be painting over it so there was no need to match the colour.
Fixing the leather tear with the Edge Paint was quite easy, as long as you have a thin tool, in this case I used the wooden end of a small thin brush and just dabbed the edge paint and blowing at it to give it the gluey sticky consitency. I let this dry for an hour.
I cleaned the whole bag with the HG Deep Cleaner. I've used this on some of my bags but never to the depth of what I had to do with this bag. This cleaner seems to really open up the pores of any leather I've used it on and takes away some of the sheen. I couldn't get a hold of a Leather Preparer/Stripper, which is what's recommended by everyone before dyeing any leather. I hoped this Deep Cleaner would do the trick and it has. I waited for it to dry before applying my first coat of dye.


I chose the colour Oxblood as I hoped to get a burgundy with purply tinges on the bag. As the original colour of the bag was blue, I knew that adding on a blue based red paint would give me that effect. I also had the colour Purple on hand incase I needed to mix it, but after patch testing, the Purple left a lot rosy gold coating on top, which didn't look very nice. One thing I also had to consider was if the dye would take and complete absorb on the stitches and the zippers. In this case, it didn't completely go Oxblood, but more purple, which is what I had expected and it doesn't look completely bad.
The best thing about this dye, for me, was that it's really penetrating. A small amount goes a long way. As soon as I dab it, it almost bleeds out, which is good as you know it has saturated the leather.
After 2 coats of dye, I let it dry for an hour, even though it feels dry to the touch almost immediately. I buffed the whole bag with just a white cloth before applying 2 coats of Acrylic Resolene. You need to use a damp cloth to apply the Acrylic Resolene. Just dab a bit of the Resolene on the cloth and apply to the bag in a sweeping motion. I read up on Resolene and people have said that it gets tacky and leaves a sticky residue if not applied properly, so use sparingly at first and make sure your applicator is damp, not dripping wet.
I let the Resolene dry for half an hour before buffing the whole bag with a dry white cloth and as you can see in the last picture, it makes a lot of difference. There's very little colour rubbing off. Resolene is suppose to act as a sealant for the dye aswell as waterproofing it.
I am overall ecstatic with the outcome. Very fortunate that the leather was so forgiving and took the colour nicely.
Thank you for stopping by! If you have any questions please leave a message below!
xxx